django使用markdown将.md渲染成html
1. 安装markdown
pip install markdown
2. 创建一个django项目和用来测试markdown的app:
django_test_markdown
django-admin startproject django_test_markdown
cd django_test_markdown
python manage.py startapp test_markdown_app
2. 编写一个markdown的文件
如test.md
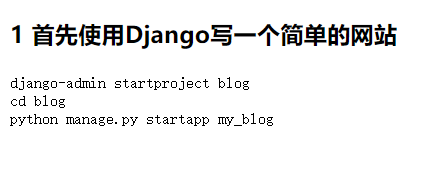
###1 首先使用Django写一个简单的网站
```
django-admin startproject django_test_markdown
cd django_test_markdown
python manage.py startapp test_markdown_app
```
(想知道我怎么在markdown中写markdown的吗? 在这一段之前加tab制表符即可。)
创建一个static/article文件夹放置这篇文章
现在项目的目录树为:
D:.
├─.idea
│  └─inspectionProfiles
├─django_test_markdown
│  └─__pycache__
├─static
│  └─article
├─templates
└─test_markdown_app
    └─migrations
3. 读取test.md 并显示。
3.1 在test_markdown_app应用中的views.py中加一个get_article()函数,如下:
from django.shortcuts import render
import markdown
import codecs
from django_test_markdown.settings import BASE_DIR

# Create your views here.

def get_article(request, article_name="test"):
    article_path = str(BASE_DIR)+"/static/article/"+article_name+".md"
    file = codecs.open(article_path, "r", encoding='utf-8')
    data = file.read()
    article = markdown.markdown(data,
        extensions=[
        # 包含 缩写、表格等常用扩展
        'markdown.extensions.extra',
        # 语法高亮扩展
        'markdown.extensions.codehilite',
        ])
    context = {'article': article}
    return render(request, "article.html",
3.2 在templates文件夹中添加一个article.html
article.html:
<!DOCTYPE html>
<html lang="en">
<head>
    <meta charset="UTF-8">
    <title>Title</title>
</head>
<body>
    <p>{{ article |safe }}</p>
</body>
</html>
3.3 在urls.py中添加一个导航
from django.contrib import admin
from django.urls import path
import test_markdown_app.views as test_markdown_app_views

urlpatterns = [
    path('admin/', admin.site.urls),
    path('', test_markdown_app_views.get_article),
    path('article/<str:article_name>', test_markdown_app_views.get_article),
]
3.4 在settings.py中加一下static文件夹的位置,一会儿访问css要用
import os
STATICFILES_DIRS = (
    os.path.join(BASE_DIR, "static"),
)
4 在浏览器中输入127.0.0.1:8000即可看到效果

可以看到他的源代码为:
<!DOCTYPE html>
<html lang="en">
<head>
    <meta charset="UTF-8">
    <title>Title</title>
</head>
<body>
    <p><h3>1 首先使用Django写一个简单的网站</h3>
<pre class="codehilite"><code>django-admin startproject blog
cd blog
python manage.py startapp my_blog
</code></pre></p>
</body>
</html>
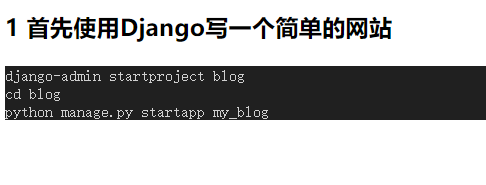
说明markdown这个库成功把md的文字转换成了html,并且引入了一个class,名字叫做:"codehilite",这个就是用来给markdown设定不同css用的。
5.1 markdown简单的css设置
上面的实现代码看起来并不好看,所以加一个markdown的基本格式设置
样式表可以去这里下载:https://github.com/richleland/pygments-css
但是他的css很鬼畜,下了还不能用,还改改
你要是官方的操作就是先安装Pygments:pip install Pygments
然后使用命令:
pygmentize -S monokai -f html -a .codehilite > monokai.css
生成的css和他github上提供的css的唯一区别就是,css前边所有的.highlight 都改成了 .codehilite
例如:
.highlight .hll { background-color: #ffffcc }
改成了:
.codehilite .hll { background-color: #ffffcc }
仿佛是个**
所以你自己用代码改也行,不用安装那个鬼畜的东西
这里给你一个代码:
import os
import requests


'''
这里从github上的一个项目下载css,里面有好多你可以自己选择

项目地址:http://github.com/richleland/pygments-css/blob/master/native.css
'''

save_folder = "./css"
raw_css_folder = save_folder+"/raw"
refine_css_folder = save_folder+"/refine"

css_name = "native"

def mkdir(path):
    if os.path.exists(path) == False:
        os.mkdir(path)

def download_css():
    mkdir(raw_css_folder)
    url = "https://raw.githubusercontent.com/richleland/pygments-css/master/"+css_name+".css"
    response = requests.get(url, verify=False)
    file_path = raw_css_folder+"/"+css_name+".css"
    file = open(file_path, "w", encoding="utf-8")
    file.write(response.text)
    file.close()

def refine_css():
    mkdir(refine_css_folder)
    raw_css_path = raw_css_folder + "/" + css_name + ".css"
    refine_css_path = refine_css_folder+"/"+css_name+".css"
    if os.path.exists(raw_css_path) == False:
        print("download failed!")
        return
    raw_css_file = open(raw_css_path, "r", encoding="utf-8")
    raw_css_text = raw_css_file.readlines()
    raw_css_file.close()

    refine_css_file = open(refine_css_path, "w", encoding="utf-8")
    for i in range(len(raw_css_text)):
        refine_css_file.write(raw_css_text[i].replace(".highlight", ".codehilite"))
    refine_css_file.close()

if __name__ == '__main__':
    mkdir(save_folder)
    download_css()
    refine_css()
里边好多css你使用了可能没啥变化,多试几个吧。。
用法:
在article.html中引用我们的css
<!DOCTYPE html>
<html lang="en">
<head>
    <meta charset="UTF-8">
    <title>Title</title>
    <link rel="stylesheet" href="/static/style/native.css">
</head>
<body>
{{ article |safe }}
</body>
</html>
然后效果图:

emmm 不好看,你自己去找吧,23333
5.2 markdown带语法高亮的css和js
使用的项目是:https://github.com/highlightjs/highlight.js#links
我的项目是传统的css加js,你要是vue的框架你去用vue
这个项目分两步:
第一 用Getting the Library那里的link把需要的css和js下载下来
推荐使用unpkg这个,别的我打不开
<link rel="stylesheet" href="https://unpkg.com/@highlightjs/[email protected]/styles/default.min.css">
<script src="https://unpkg.com/@highlightjs/[email protected]/highlight.min.js"></script>
<!-- and it's easy to individually load additional languages -->
<script src="https://unpkg.com/@highlightjs/[email protected]/languages/go.min.js"></script>
其中那个css是makrdown的样式,highlight.min.js是将没有样式的标签加上样式,go.min.js是关于go语言高亮适配的一个简单写法,可以参考他的写法适配自己想适配但默认缺没有适配的语言。
article.html最终: default.min.css -> markdown.min.css highlight.min.js -> markdown.highlight.min.js go.min.js -> markdown.go.min.js
<!DOCTYPE html>
<html lang="en">
<head>
    <meta charset="UTF-8">
    <title>Title</title>
    <link rel="stylesheet" href="/static/css/markdown.min.css">
    <link rel="stylesheet" href="/static/css/katex.min.css">

</head>
<body style="font-size: 28px">
    {{ article |safe }}
</body>

<script defer src="/static/js/katex.min.js"></script>
<script defer src="/static/js/auto-render.min.js" onload="renderMathInElement(document.body);"></script>

<script src="/static/js/markdown.highlight.min.js"></script>
{#markdown.go.min.js is a simple example for you to apply for a new laugage #}
<script src="/static/js/markdown.go.min.js"></script>
<script src="/static/js/main.js"></script>

</html>
并且在view.py中的markdown配置时记得去掉高亮扩展,不用那个了。
from django.shortcuts import render
import markdown
import codecs
from django_test_markdown.settings import BASE_DIR

# Create your views here.

def get_article(request, article_name="test"):
    article_path = str(BASE_DIR)+"/static/article/"+article_name+".md"
    file = codecs.open(article_path, "r", encoding='utf-8')
    data = file.read()
    article = markdown.markdown(data,
        extensions=[
        # 包含 缩写、表格等常用扩展
        'markdown.extensions.extra',
        # 语法高亮扩展
        # 'markdown.extensions.codehilite',
        ])
    context = {'article': article}
    return render(request, "article.html", context)
关于markdown的导航是用toc扩展即可。'markdown.extensions.toc',
md = markdown.Markdown(
        extensions=[
            # 包含 缩写、表格等常用扩展
            'markdown.extensions.extra',
            # 语法高亮扩展
            # 'markdown.extensions.codehilite',
            # 目录
            'markdown.extensions.toc',
        ],
    )
渲染的时候类似于文章的写法写成:
<ul> {{ toc|safe }} </ul>